How to Plan the Perfect Travel Itinerary with Google Maps
One of the great pleasures of my life is planning trips. Anywhere, anytime, whether I actually have any travel booked or not. Over the course of my life, I must have sketched out dozens — hundreds? — of trips I had no immediate plans to take, and in fact may never take.
I would never say that planning a trip is more fun than actually taking the trip, but for me, part of the joy of travel really is in the planning.
But I know that’s not true for everyone. For some people, the idea of developing an itinerary feels so overwhelming that it deters them from traveling in the first place. For others, the thought of planning anything at all feels so restrictive that they head off for far-flung destinations with little to nothing in mind — which, while fun and spontaneous, can result in missing some of the best things those places have to offer.
I think Google’s “My Maps” system can solve both those problems. In this post, I’ll show you in detail the way I use My Maps to plan my own trips. It’s a system that lends itself perfectly to many types of planning instincts: you can use it to create a detailed, day-by-day plan, or to prepare yourself properly for a trip with no real plans at all, or to do something in between.
Here’s how it works.
How to Make a New Map in Google Maps
Here’s a three-step process for developing a map for a destination or trip in Google Maps.
(1) Create Your Map
First, create a map for your trip on My Maps.
To do this, go to https://www.google.com/maps/d/ and click on “Create a New Map.”

Alternatively, you can go to the regular Google My Maps homepage and click on the three lines in the upper lefthand corner of the page (to the left of the search bar). Next, click on “Saved.” You’ll then see something that looks like this (maybe without any maps already listed):

Click on “Create Map” at the bottom of that list.
Now, name your map. To do this, click on “Untitled map” in the upper lefthand corner. A new box will pop up asking you to type in the new name and, if you want, to add a description (this is optional).

Heads up that once you’ve created a map, you can view it on your phone, but you cannot create or edit a My Map on your phone.
(2) Add Layers to Your Map
Now, think about the categories of information you want your map to include. You will organize these as “layers” in your map.
Here’s what I mean. For pretty much every travel map I make, I include the following layers:
- Transit (any train stations, bus stations, airports, etc. that I think I may use)
- Lodging (the locations of my accommodations)
- Sights (museums, notable buildings, picturesque spots, trailheads, pretty much anything I think I might want to see or do)
- Food (restaurants, bars, etc. that I am especially interested in trying)
You can customize this in any way that seems useful to you. Maybe you’d prefer to break things down even further, creating separate layers for “Museums,” “Churches,” and “Trailheads,” for example. You can do that!
Or maybe maps for certain trips would benefit from unique layers. For example, for an upcoming trip to Salzburg, my map has a layer just for Sound of Music filming locations. If you are visiting a city for some sort of music or art festival, maybe you’ll want to make a layer for all of the places where you can find music stages or art displays.
What’s the benefit of layers? Well, in addition to keeping things nice and organized, you can toggle layers on and off. For example, while you’re actually on your trip, if you’re out and about and you’re dying for something to eat, you might want to see your “Food” layer on its own for a minute while you search for a nearby restaurant. You can do this by unchecking the boxes beside the other layers.


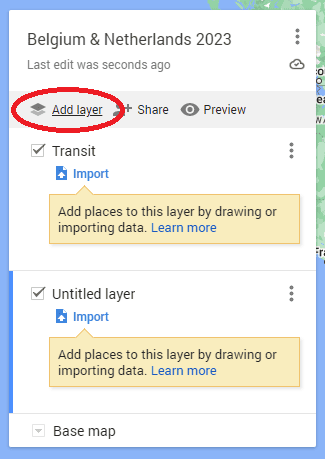
When you create a new map, it will by default have one layer. Rename it by clicking where you see “Untitled layer.”
To add more layers, click on “Add layer,” which should be just below the name of your map.
(3) Add Items to Your Map
Here’s where the real work begins: it’s time to find the things and places that interest you and add them to your map.
Note that this does not need to be a comprehensive process — and in fact, it really can’t be. On the best trips, you tend to discover wonderful things while you’re actually at your destination. You can’t expect your map to have every single thing you will see and do and eat during your trip (nor would you want it to).
Accordingly, the amount of detail you include in your map is really up to you, and might depend on how you think you’ll want to use your map (more on that later).
Here’s what I do: for each city I’m visiting, I Google a few things like “best things to do” and “best places to eat.” I also like to check Atlas Obscura for things off the beaten path! From that research, I add anything that sounds good or interesting to my map. Here’s how to do that:
Click on the layer you want to add the item to. In this case, I will be adding a restaurant, so I clicked on my “Food” layer. Then, search for the item in the search bar. If it’s a place Google recognizes, it should automatically appear as one of the drop-down items. Click on the item. It should look something like this:

Next, click on “+ Add to map,” which you’ll find at the bottom of the popup displaying information about the place you’ve selected. The place will now appear in the relevant layer on the left.
Now that the item has been added to a layer, you can customize the appearance of the item on your map. I like to give the items in each layer a different color, and I also like to customize the icon of each item depending on what type of place it is. For example, I give my lodging locations a small bed icon, photo spots a camera icon, and churches a cross icon.
In this case, I am adding a restaurant, so I give it an eating utensils icon, and also select the color that I want to give to everything in my food layer. You can do this from the “Style” button at the bottom of the popup (looks like a paint can):

I then repeat this process anywhere from a dozen to hundreds of times, depending on how much research I’m doing and how many items I want to add to the map.
If I’m planning to do any day trips, I will typically do the same for those places too. For example, during my trip to Belgium, I planned to take day trips to Ghent and Bruges, so I also looked up things to do and places to eat in those cities, and included them on my map.
I like to be overinclusive, so I usually load up my map with more than I will actually do.
At the end of all that research and map-populating, here’s what my map for a 10-day trip to Belgium and the Netherlands looked like:
How to Use Your Map to Plan Your Itinerary (…Or Not!)
How you use your map from here is totally up to you. I’ll tell you what I do with mine, and give you some other ideas for ways that your map can be useful.
First, I list out all the days of my trip (including days of the week). I will use this list to start filling in my itinerary. At the beginning, this is a very basic document that just looks like this:
- Thursday, March 16: fly to Brussels
- Friday, March 17: arrive in Brussels
- Saturday, March 18: day trip?
- …and so on
Then I make a separate list of the things I’m most interested in doing or seeing, and I look up important information about them. For example, if I know that visiting the Anne Frank House is a high priority while I’m in Amsterdam, I would look up the opening hours and ticket prices, as well as things like whether I need to buy a ticket in advance (definitely yes, as to the Anne Frank House!).
Here’s an excerpt from my list of things to do in Amsterdam:
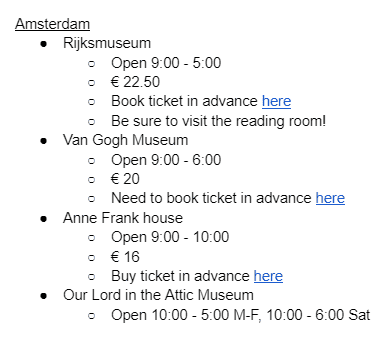
Once I have a list of things to do, I decide when I will visit any spots that have limited opening hours or require tickets to be purchased in advance. For example, during my trip to Amsterdam, I needed to buy tickets to the Anne Frank House well in advance of my trip, so I decided which day I would visit that museum and plugged it into my new itinerary. I also reserved a few other tickets in advance (additional museums, a canal cruise) and adding them to my itinerary as well.
At the end of this, here is what the Amsterdam portion of my itinerary looked like:

As you can see, this is pretty bare bones. I wanted to leave plenty of breathing room for just walking around and following whatever things looked interesting, and did not plan beforehand to visit any particular restaurants. However, it’s also possible to use this process to create a much more detailed itinerary.
If you want to make a more detailed itinerary this way, a great way to do it is to look for things that are all located closely together on your map. Then, try to plan out a day that includes them all (or many of them) in a reasonable way.
For example, looking at part of my completed map for Amsterdam, I might consider trying to do all the things in the circled area during one day, since they are a bit more removed from the other items on my map.
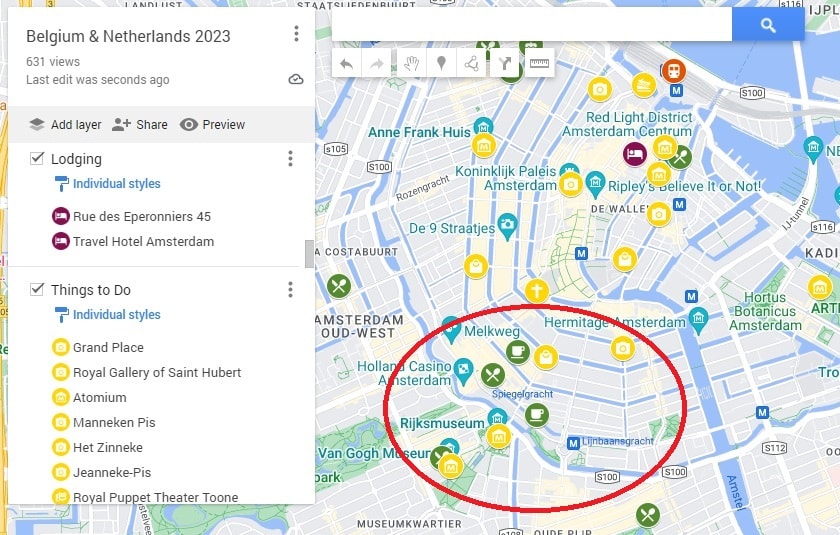
A more detailed itinerary for this day of my trip might look something like this:

If you’d like to see the completed itinerary I developed for this trip, you’ll find it here. As you’ll see, it’s a real mix of actual plans and rough lists of things I might consider doing. There’s even a planned day trip to Luxembourg, which I didn’t ultimately do (on a whim, I went to Namur and Dinant instead).
Here are some other ways you might use your map:
Choose your lodging.
I tend to select my lodging before I even start on my map, but there are benefits to doing it the other way around.
If you make your map and load it up with all the sights you want to see and the places you want to eat, you might be able to pinpoint an area in your destination that’s within walking distance of many of your points of interest. Then you can narrow your lodging search to that area.
Or, if you’re like me, you might want to stay in a place that’s close to the train or bus station where you’ll be arriving to town. (It means you don’t have to schlep your bag so far, and maybe you can walk there instead of paying for a taxi or a bus to your hotel.) If you add transit stations to your map, you can look for lodging around that area.
Find things to do on the go.
This is a top-tier benefit of making maps on My Maps. If you are out exploring your destination and you find yourself with some free time, you can pull up your map and see what from your map is near your current location.
One thing I like to do is add picturesque locations to my map. In many instances, these might not be spots I specifically carve out time in my itinerary to see, but while I’m out and about, if I see on my map that I’m near one of these spots, I can easily pop over.
Another way I often use my maps on the go is to find food. If I’m out exploring and I get hungry, I can pull up the Food layer on my map and see what’s nearby.
To pull up your map on your phone, open the Google Maps app and click on “Saved” at the bottom of your screen, then on “Maps.” You will then see a list of all the maps you have created or saved, and can open any of them.

Follow your whims each day.
Maybe you’re the type of person who hates creating an itinerary because it feels too restrictive, and you prefer instead to fly to a new place without any idea what you’ll do on any given day. That’s fine!
But you can still benefit from using My Maps. Create your map in advance and fill it with some of the things that interest you. Then, when you arrive, pick a neighborhood to explore and try to hit a bunch of the places you identified in advance. Or, just pick one spot as a starting point and wander from there.
Even if you don’t use your map to actually create an itinerary, you can still benefit from making a map and doing much of the same research in advance. You’ll know if there are particular places that you want to hit at some point during your trip, and, most importantly, you’ll know when those places are closed.
Doing some research in advance, even if you don’t actually plan any sort of day-by-day itinerary, also helps alert you to any special events you might otherwise miss. For example, during my visit to Amsterdam, the Rijksmuseum was featuring a special exhibit on Vermeer. But I didn’t start preparing my map (and doing my research on Amsterdam) until a few weeks before my trip, at which point tickets to the Vermeer exhibit were already sold out.
In short, even if you prefer to travel on the fly and follow your whims (which is totally fine!), the My Maps system can help you make the most of this style of travel too!

Final Thoughts
Google Maps can be a powerful tool for traveling better, no matter whether you love to plan every detail or follow your whims. Use this system to develop an itinerary that works best for you!
Happy planning!
More Travel Tips
FLY FOR FREE | Never pay for a flight again by making the most out of travel credit cards.
SOLO TRAVEL | Check out my best tips for first-time solo travelers.
TRAVEL SPENDING | Find out how much travel really costs at these posts about how much I spent for one month in Italy, one week in London, four days on the Isle of Man, 10 days in Northern Ireland, and 10 days in Belgium and the Netherlands,
pin this post